How To Successfully Deploy Your Web or Mobile API to Heroku
I have deployed a wide variety of APIs, from internal to APIs for public or partner consumption. Many of them have been deployed to Heroku. There are a variety of advantages, including reduced server configuration, easy scaling, and a great vendor ecosystem for third-party add-ons.
However, many have not experienced Heroku before or have not considered it for an API deployment solution. This article provides an overview of Heroku, including how it works and how to get the most out of deploying your API to their platform.
What is Heroku?
 Heroku is a Platform-as-a-Service (PaaS) that offers managed services for the deployment, management, and scaling of web applications. Acquired by Salesforce, Heroku has become an accepted platform for quickly deploying and scaling applications for startups and enterprises. There is no requirement to create custom deployment and server configuration scripts, as it is all handled by the Heroku platform, command line tools, and its integration with git.
Heroku is currently on the third version of their platform, codenamed “Cedar”. Originally focused their services around Ruby on Rails, the current Cedar stack is designed to handle technology stacks beyond Ruby and Rails. This provides flexibility for companies that may need more than one technology to build a solution.
A single Heroku account may host any number of applications. Each application has an owner and may have any number of collaborating accounts, allowing multiple members of a team to deploy and manage an application. Applications may be accessible via a standard HTTP connection or via HTTPS if an SSL certificate is installed.
How Does Heroku Work?

Heroku utilizes Amazon EC2 instances for deployments to their platform. This enables other Amazon-based services to be used in-network, reducing or eliminating most bandwidth charges.
The service is currently deployed to us-east-1 within AWS, limiting the ability to deploy to multiple regions. Deployment to multiple regions is currently being evaluated and is likely to emerge in the future.
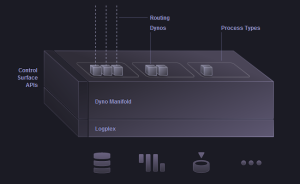
Dynos are processes managed and monitored by the Cedar Stack, typically associated to an application tier (e.g. a web application) or service (e.g. background job processor). Dynos are contained within a Dyno Manifold that isolates the application, including libraries (e.g. Ruby gems), from other applications for security.
Dynos may be increased or decreased (to 0) as needed. The Heroku platform will perform the work of deploying the application to more or less dynos, as required. Heroku provides one dyno for free per application.
Managing Your Heroku Applications
Heroku management is based on a public API that is available to all accounts. This API may be used directly for custom integration into an internal release management workflow.
In addition, the Heroku CLI (“command-line interface”) allows for full access to the API in a scriptable manner. This includes the instantiation of new applications, management of add-ons, life-cycle control, remote monitoring, log file access, and remote process execution such as upgrade
scripts. The CLI is useful for developers that wish to manually interact and/or automate the management of their applications.
A web-based management dashboard is also available. It has been built on top of the management API with basic provisioning, configuration, and rudimentary statistics (disk usage, allocated dynos, etc). However, most find that the CLI or API is the best method of managing deployed applications.
Why is Heroku such a great fit for deploying APIs?
There are several advantages for deploying your API to Heroku:
- Removes the need to setup and configure servers and network infrastructure
- One-step to deploy your latest code, using the command-line, Github integration, or their new one-button deploy feature
- Security updates are managed by Heroku staff, not your staff
- Ecosystem of Heroku and third-party add-ons allow for easy extensibility
- You can scale your processes up or down as needed to meet demand, using their command-line, API, or web dashboard
- Background processes can easily be deployed and scaled for long-running jobs, message processing, and other computational needs
- Provides a platform for deploying solutions built using a microservice architecture
Taking Advantage of the Heroku Ecosystem

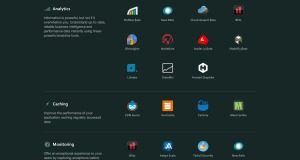
Heroku has a variety of add-ons that can be used to enhance and extend your API. These add-ons are services offered by Heroku or third-parties that may be provisioned for free or a monthly charge. Certain add-ons are free or have a free tier, but use caution when enabling add-ons to prevent unexpected charges on your monthly Heroku bill.
Settings such as user names, passwords, host names, and tokens are passed to the application using environment variables. Some add-ons, such as host name-based SSL, require additional configuration steps to be performed for the application before the add-on may be enabled.
Must-Have Add-ons
There are a variety of very useful Heroku Add-ons that can benefit APIs. The following is a short list of those we generally recommend for consideration. Of course, your specific API architecture and implementation requirements may vary, so be sure that these add-ons will work for your specific environment.
Buildpacks – Not really an add-on, but buildpacks are used to setup and configure a dyno for your application. Many pre-built buildpacks already exist, but you can fork one and customize it as needed to ensure you have everything you need.
Domains – Configure your API to respond to your custom domain name, rather than *.herokuapp.com. Follow the instructions to setup one or more entries using CNAMEs.
SSL – Heroku provides a unique subdomain for each application, with SSL support. If you are using your own domain, you will want to generate and upload your own SSL certificate so that you can serve your API over HTTPS
PG Backups – If you decide to use Heroku’s hosted PostgreSQL service, be sure to enable the PG Backups add-on. It is free and provides options for 1 week or 1 month retention. Just be aware that developer databases support manual backups only.
Monitoring – Once your API is deployed, you will want to be notified when performance degrades or errors are identified. Try New Relic or 3scale (Kin Lane wrote an excellent overview article on using Heroku + 3scale).
Logging Services – Unless you choose to use an add-on such as 3scale for logging your requests, or if you are deploying your API alongside a web application, you will want to monitor your application logs. Heroku provides built-in logging, but look for add-on services such as Papertrail to archive them and make them searchable.
Continuous Deployment – There are multiple solutions for continuous deployment on Heroku, including Travis CI and Codeship (which can help with your Github integration as well)
For a complete list of add-ons currently available, visit the Heroku Add-Ons page.
Overcoming Heroku Process Reaping
Heroku hosts of variety of applications, some of which see little or no activity during a 24 hour period. Therefore, Heroku has a policy to reap processes after a period of no activity. These processes will be started once the Heroku routing layer detects an incoming request for an idle application. Depending on the start-up time required for your application, you may witness delays from a few seconds up to 30 seconds before the process is ready. This can be an issue for APIs that do not see consistent traffic but wish to offer consistent response times without this delay.
To overcome this, install the New Relic add-on or use a third-party website health check service. This will ensure that website health checks are sent to the site on a regular basis, ensuring that your process receives regular requests and stays active. Be sure to use a service that performs a check using HTTP or HTTPS, and that you have a static page or API endpoint that will return a 200 OK response code if your application is in a good state.
Securing Your API
There are several steps that we recommend be taken to secure your Heroku-deployed API. A few of these are specific to Heroku and its deployment model, while most of these are common to any application:
- The use of HTTPS for access to all deployed APIs either by using their pre-installed SSL certificates (for their *.herokuapp.com domains) or installing a custom SSL certificate (when using your own custom domain)
- Enforce secure database connections using SSL to protect sensitive data transmitted to and from applications (data in motion)
- Use of a strong passphrase for all Heroku and third party user accounts
- Ensure secure storage of SSH keys to prevent disclosure, replace keys if lost or disclosed
- Use individual contributor accounts rather than sharing a single user account to allow for easy revocation of API access when necessary
- Prevent sensitive data from being written to STDOUT or to log files, including submitted form field data by using a logging system with smart filtering enabled
- Passwords should be one-way encrypted and include a salt to further encrypt the password
Additional Resources
- Heroku Dev Center is full of cookbooks and HOWTOs
- Higher Order Heroku is a website dedicated to tips and links to articles, both from Heroku and other websites
- Common Heroku questions already answered on StackOverflow
- My slide deck from a short presentation given in 2013 to a local meetup:
Questions? Drop me a comment below or a private note and let me know.